1. Planning of cable route
Start by planning the exact route of the cable. This is crucial for the optimum function and longevity of the installation.
2. Check the specification
Check whether the specification of the cable matches your desired application.
3. Laying out the cable
Lay the cable in a straight line on the floor. It is best to use a cable dispenser to make handling easier.
Make sure that the cable is not twisted.
4. Mounting the plug
Fit the plug at the end of the cable if it is not already attached.
5. Examination of the chamber
Before inserting the cable into the PIT system, check the chamber for damage and sharp-edged components
6. Introducing the cable
Insert the unassembled end of the cable into the PIT system without forcing or twisting it.
7. Condition of guide rollers
Ensure that the guide rollers are in good condition and can be moved easily.
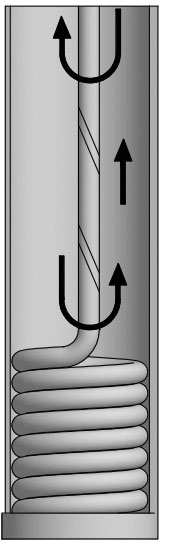
8. Inserting the cable
Before connecting the cable, make sure that the cable is inserted as shown in the schematic diagram.
With the GP 400 SF cable, the cable must be inserted anti-clockwise due to the direction of lay. This is important in order to be able to attach the cable clamps in the correct position.
9. Fitting the cable clamps
When attaching the cable clamps, make sure that the cable is fastened without constraint or twisting.
10. Connection to switch box
Connect the cable to the switch box.
11. Final check
After connecting the cable, pull it out once along its entire length and reinsert it to ensure that everything is installed correctly.After connecting the cable, pull it out once along its entire length and reinsert it to ensure that everything is installed correctly.
The cable is pulled out of the PIT system in clock direction. The cable is turned up! |
| The cable is inserted against clock direction without twisting. |
Maintenance notes
To ensure the longevity of the cable, maintenance is required at least once a month, depending on use. The cable should be fully laid out and the following steps carried out:
- turn back any axial twists in the cable
- visually check the cable for damage
- check roller packs for free movement
- check the cable clamps